Building Blocks to Reading
Materials extracted from "Building Blocks to Reading, Parent/Teacher Guide" copyrighted
1994 Karen M. Potter. All other material copyrighted 1996 Karen M. Potter
About "Building Blocks To Reading"
- Learning Train Display
- Letter Picture Puzzles and Games
- American Sign Language Chart
- Tactile Materials
- Student Book
- Letter Activities
- Student Tape
- Letter Picture Puzzles and Games
We'll examine "Building Blocks to Reading" and some common sense ideas to help
children learn to love learning.
- Parent/Teacher Guide,
- Alphabet Learning Train - a display,
- Learning games,
- Tactile materials for all letters except e and g,
- Letter picture puzzles,
- Letter game cards with pictures,
- "Building Blocks to Reading" student cassette tape,
- "Building Blocks to Reading" - The Student Book.
- Pouch for tape and small materials,
- Binder with room for all your materials.
The Parent/Teacher Guide
The Parent/Teacher Guide is a comprehensive guide to the learning materials you will find in your "Building Blocks to Reading" kit. Below is a sampling of the activities and learning ideas you will fine in the Parent/Teacher Guide.
Create a reading and writing center.
Pick a convenient place in your home to create a reading and writing center. The materials
that you will want to put in this center will depend on the age and interests of your child.
In general, you might want to place several of your child's favorite books, magazines or
other fun reading material, two small boxes, one for weekly letter material and one for
game cards and puzzles from letters already studied, and other learning materials from
"Building Blocks to Reading".
For the writing part of the center you may want to include crayons, markers, pencils, different colors and types of paper, scissors, and a glue stick.
Encourage your child to play at this center often. You will want to rotate reading and writing materials often to keep the center fun and interesting. Perhaps you will want to let your child help pick which materials to put in the center each week.
      "The Learning Train" display offers your child a fun reference
      source that can also help your child keep track of his progress
      and offers a fun source for letter review. "The Learning Train"
      is printed in black and white on 20 lb bond.
Alphabet Learning Train - a display
Place the Learning Train Display on a wall or table where it will be seen often by your child. A good place would be on the wall near your reading and writing center. We want your child to think of the letters and their sounds often. The more often your child is exposed to written language, the quicker he learn written language.This display can be used as a sound dictionary of sorts. When your child sees a letter but can not remember the sound, he can find the letter in the display and use the picture clue to help him remember the letter sound. Also, when your child hears a sound but can not recall the symbol that makes that sound, he can look up the sound using the picture clues.
When working with younger children or children who have had little experience with the letters and their sounds, it is useful to display the letters as they are introduced. Start your train with only an engine and a caboose. When you introduce a letter add the train car carries that letter. Let your child have the pleasure of placing the car on the train.
Letter Picture Puzzles and Learning Games
There are many learning games described in the Parent/Teacher guide. These are readiness games that help teach listening skills and sound discrimination skills. There are also game boards for "The Learning Train Game" and for "Baby Animals from Mars" game. TheLearning train game is a beginning game to that gives children a fun opportunity to practice the beginning letter sounds. The game "Baby Animals from Mars" is designed to be the final step in this stage of language development and a transition point to the next step. This game helps make the transition from individual letter sounds to words.
"The Learning Train Game" and "Baby Animals From Mars" are printed in full color and laminated for hours of learning fun. Your child will enjoy practicing new skills with the new learning friends featured in "Building Blocks to Reading."
The Building Blocks to Reading program comes with in a binder with pockets and a zipper pouch. You games and other teacher materials all fit nicely into the binder to help keep your materials together and organized.
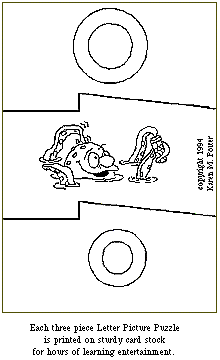
Letter picture puzzles and letter game cards with pictures The game cards and letter picture puzzles are great to help introduce each letter. Place the letter flash card and letter/picture puzzle in a small box with several small objects, toys or pictures of objects that start or (for older children) end with the letter of the week. Show your child the flash card. Talk about the picture and how this picture can help your child remember the letter sound. Tell your child what the letter of the week says and it's name. Pull one thing out of the box one at a time. Say the name of the object, be sure to stress the sound of the letter of the week.
Bring out the letter/picture puzzle. Talk about the size and shape of big and little or upper and lower case letters. Try writing in the air. Make big swinging motions in the letter shapes. Write them on a piece of paper and practice moving the pencil to form the letter.
American Sign Language Alphabet Chart
The American Sign Language Alphabet Chart is included on the last page of your Parent/Teachers guide. Don't forget to use it.
The teaching of sign language is multi-purpose. It adds body movement to the learning process, it gives you a tool to use throughout the day to remind your child of the letter symbols and their sounds, it gives your child a model of the letter to keep with them, it helps to teach inclusion, and gives your child an understanding of differences in people.
Use sign language in this program from the moment you introduce the first letter. When you first talk about a letter, help your child form the letter sign with their right hand (always use the right hand to sign the alphabet). Use a washable marker and write the lower case letter on the child's hand (see the chart in the Parent/Teachers guide for letter information). Now your child has the letter of the week to carry around with him all day. As the day progresses, occasionally stop and ask your child to show you his letter. If necessary, help him form the letter and then ask what the letter says.
Review the letter signs by signing the alphabet as you sing the "ABC Song." Once your child has learned sign language he will always have a sample of the alphabet in their hand. This will help if he has trouble distinguishing the difference between letters "b" and "d" for example.
All these materials should be made available at your reading and writing center. Simply place your box on the table and post the sign language chart on the wall near the center.
Tactile Materials
In combination with the student book your child can use the tactile materials to form the letter shapes with interesting textures. The tactile materials will give your child a feel learning the letter symbols and sounds. "Building Blocks to Reading" kit comes with tactile materials for all letters except for letters "e" and "g" Materials for "e" and "g" are common materials and would be available to most families. There are suggestions in the teachers guide describing tactile materials and their use for all letters.
These tactile materials consist of all kinds of fun stuff. You will find differently colored diamonds, macaroni, plastic ants, kite stickers, and more. All these different textures and object clues will make learning that much more fun for your child.
The Student Book
Customizing the cover.
Look at the front cover of the student book "Building Blocks to Reading". At the
bottom you'll find the words "Customized by" with an empty space below. This space
is where your child's name belongs! This is your child's book and with his creativity
it will be like no other. The imagination and creativity of your child needs to be
nurtured and rewarded. Your child deserves to have his name on the front of this book
since your child is the most important ingredient in the success of any enjoyable learning
effort. For that reason you should take the time to explain to your child that he will
play an important roll in the creation of this book. No one else will ever have a book
exactly like the one he creates!
Dedication and "About the Customizer" Pages.
Many children are unfamiliar with the dedication and author pages in books. Don't overlook
these pages as they bring the human quality into your child's world of books. These pages
let your child know that books are written by ordinary people. People just like mom, dad,
grandparent or people just like them. Your child need to know that he too can create books
that will be treasured. Point out the dedication and author pages when you read to them.
Talk about the dedication pages. To whom or what was the book dedicated. What was the author feeling when the book and dedication were written? What would your child want to say if he were to write a book dedication?
Talk about the author pages in the books you read. What do you learn about the author? Many author pages tell where the author lives and some of the things he likes to do. If you wrote a book, what would you want to tell readers about yourself?
The "About the Customizer" page is for the child that owns this book. It is there to let the child know he is important. It should be completed after your child has some understanding of author and dedication pages. Your child can use this as a dedication page of his own or, as an author page, he can use it to tell about himself.
Place a photo of your child or a picture drawn by him in the space provided. Have your child write something about himself or you can take dictation. Your child needs to know that what he has to say is Important! What he has to say is so important that it needs to be written in a book.
"The ABC Song"
"The ABC Song" is used to teach letter names and alphabetical order. Many of the letter
names contain clues to the letter sounds. Alphabetical order will be important in future
years of learning. Please note that the letter sounds are not taught in order. The reason
for this is that we want instant recall for each letter sound. We do not want to have to go
through the alphabet to recall a letter name and then associate the sound with the name.
When your child to see a letter, you want the first thought in their mind to be the letter
sound (not the letter name).
Vowel Song
Vowels are in every word of the English language. Many children have difficulty hearing the
difference in the short vowel sounds.
Practice the vowel song. Record the vowel song when you're ready. Don't push your child for perfection. It is more important to have a fun learning experience. I suggest that you listen and play along with your tape everyday.
Letter Activities
Each letter has two pages. The first is the creativity/practice page and the second is the letter page.
Creative/Practice Page
Together you and your child cut out pictures of things that start with the letter from old magazines or store fliers. Your child may also wish to draw pictures of people and things with names that start with the letter. Let your child try to write the names of the pictures or you can take dictation for them. You should praise your child's first attempts at writing just as you praised his first steps.
Practice letter shapes at the bottom of the Creative/Practice Page. I recommend that you call the school that your child is or will be attending and ask them what style of printing they teach. There are many different styles of print used in today's schools and it's best if your child has some constancy in how they are taught. On the lines at the bottom of the page draw out an example of how a letter will look. Place a dot where your child should place his pencil to start the letter. Then, place arrows to show the direction that your child should move their pencil to form the letter properly.
Write the verbal clues on the creativity page. Use these verbal clues to help your child remember the letter's sound. This verbal clue should be used through out the day, in reviews, and if your child wishes, the verbal clue may be recorded on to the "Building Blocks to Reading" student tape. The verbal clue for the letter "M" is "/Mmmmm/ is the taste good sound."
Letter Page
Ask your child to open their book, "Building Blocks to Reading", to the letter of the week. Read the page, talk about the pictures, words, letters and sounds. Ask leading questions to get your child to tell you what they know about the words, pictures, and letters on a page. Then lead a discussion that will build on what he already knows.The letter picture page can be colored with crayon, markers, and colored pencils. There are two sets of the letters on this letter picture page, one is solid and the other is an outline of the letter. The outlined set of letters is designed for to be used in a glueing activity and should not be colored with crayon.
Give your child the tactile materials for that letter. Help your child count out loud the pieces of the material. For example, for the letter "m" you might say, "One macaroni, two macaronis, three macaronis," as you count. Each time you say the name of the material, stress the letter sound in the word. Let your child use their finger to spread glue over the outline of the letter. Then, place the small pieces of the tactile material on the letter shapes. Be sure to practice what your child will want to say when he records his version of this page.
Student Tape
One side is a read-along tape to the "Building Blocks to Reading" student book and the other side is blank. This tape is to be played to help the child learn the songs, sounds of letters, and to help give your child an idea of what he would like to record on his tape. The prerecorded side of this tape is not intended to sound professional, it is an example of what your child can do.
In the student book, turn to the page with "The ABC Song" and start the cassette. When your child has practiced "The ABC Song", turn the tape over and record him. You can even make it a family matter. Get the whole family together and make your child the star of the program. Feel free to be creative and have fun. If your child likes "rap" music then you can "rap" the songs, letter sounds, creativity pages letter pages for the tape. Use any type of musical talent that's in your family. The more fun you make it, the more memorable the learning experience will be.
As you work through this program your child will be recording his own read-along tape. He will want to hear himself over and over and over again. Be sure that the book and tape are available to him throughout the day. You will find that most children love to hear themselves on tape. As you progress through this learning program, review will be fun and come naturally.
Do activities and have fun! Do activities that are fun for your child and be sure that your child knows you are so very proud of their effort. Display their work it places where it can be seen explain it is something that you want to keep forever. Ideas for activities can be found in libraries and at your local teacher supply store. You can also check out "Building Blocks to Reading" Activites By the Letter.
Read a book! -- This learning program is no substitute for reading to your child! Educators will verify -- There is no substitute for reading. Read, read, read, and then read some more!
Go to:
- The Top of The Page
- Learning Train Display
- Letter Picture puzzles and Games
- American Sign Language Chart
- Tactile Materials
- Student Book
- Letter Activities
- Student Tape
Page
Search Puzzles
since April 24, 1998